Where Do I Start?
 The picture illustrates a rim pierced to accept a .300 inch nipple with a smaller .281 inch nipple installed. I show this because in the US .281 inch Japanese style nipples often find their way into spoke kits. It is possible this nipple could pull through during tightening, or fail in use, it is important to be sure you use the correct nipple for your rim.
 Modified Craftsman offset screwdriver (#41331) and my favorite Snap-On Spoke wrench (Snap-On #1351). You might have to file the opening a bit to get it to fit the spoke nipple.
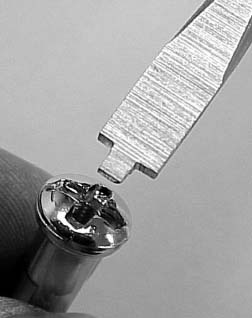 A few minutes on a bench grinder, touched up with a file, and you have the perfect wheel building screwdriver. The tip secures the blade in the nipple and then pushes the screwdriver out of the nipple as the spoke hits it. It quickly threads all the nipples to the same depth.

Click Pictures to Enlarge
Some Central Wheel Norton disc front rims (06-1951) are dimpled 3×1 and are handed. One dimple goes on the disc side and three dimples go on the non-disc side. Of the three dimples on the non-disc side of the rim, the middle one is for the disc side outside spoke (see above). In this picture the bottom is the disc side and the top is non-disc side of the rim.
This rim is handed: The three dimples in a row go on the non-disc side of the wheel. The single dimple goes on the disc-side.
The Offset: Based upon the WM2x19″ rim is offset is 1/2″ from the disc face of the aluminum hub to the nearest edge of the steel rim.
Lacing Norton disc wheels has always been a challenge. With the disc side spokes radiating out from hub to rim in nearly a flat plane, it is hard to get the rim offset correct. The disc side set of spokes, being nearly vertical to the hub provide very little sideways (axial) pull/force for the wheel builder to locate, and maintain, the rim’s offset as the spokes are tensioned.
Is there anything I should be aware of before I start? Yes, all 20 of the inside spokes, both disc and non-disc, have to be in place radiating in the right direction before you can offer the 20 outside spokes. These would be the Key Spokes for this wheel build.
 Where should I start? I kike to start with the 10 disc-side inside spokes. Place the rim (single dimple side) and the hub with the disc side facing the work bench. Lift the hub and Insert the disc-side spokes into any one of the spoke holes in the disc side spoke flange. It doesn’t matter which disc-side hole in the hub you start with. Radiate them anti-clockwise. Leave a empty hole between each of these 10 spokes.
 What’s next? You will have to determine which of the 20 non-disc side spoke holes to use to lace the 10 non-disc side spokes. If you were able to view all 40 of the spoke holes as if they were drilled in one flange you could number them in series 1 through 40. Lets move them apart as they appear in the hub. Counting clockwise from the disc-side inside spoke in hole #1, the non-disc side inside spoke will go into hole #2. You will have to weave the spokes around the disc side spokes and radiate these spokes clockwise. When you are done weaving the spokes around place it back on the work bench.

If you did it right it will look like a spider web or a pile of sort-of organized twigs. At this point you will want to start offering the spokes to the rim. I start with the disc side inside spoke. Lay them so they are radiating away from the hub in an anti-clockwise direction. Then locate the single dimple on the disc side of the rim and thread a nipple onto each spoke. To offer the non-disc side spokes look at picture below. Notice that the disc, and non-disc, spokes cross just before the reach the rim. The nipple hole just to the right of the disc side spoke is facing counter-clockwise and aimed at the non-disc side clockwise spoke. To do this they cross three spokes. Offer spokes to duplicate the pattern below.

This is what your work should look like when all 20 of the inside spokes are in place. Notice how the spokes cross each other as they are laced into adjacent spoke holes.
 Important Note: When lacing most wheels you first run the nipples onto each spoke until the end of the nipple is even with the end of the spoke threads. Not so with this wheel. You will only do that on the disc side spokes. On the non-disc side spokes you will leave 2 or 3 spoke threads showing. They will not be tightened until near the end of tensioning the spokes.

Finish up lacing the 20 outside spokes. The disc-side outside spokes radiate clockwise and end up in the middle spoke hole of the three in line. The non-disc side pokes radiate anti-clockwise and go in the last open spoke hole. Remember, you are going to run the nipple up to the end of the spoke threads on the disc side, but leave 2 or 3 threads showing on the non-disc side.
 This is the point where you start truing (and get ready to establish the rim’s offset). These disc wheels are unique. You have one set of 20 spokes on the disc side that radiate out from the hub with little, if any, axial influence on the rim. These disc side spokes are nearly vertical. You have another set of 20 on the non-disc side that radiate out from the hub at an exaggerated angle that have more axial influence on the rim than ones on the typical wheel.
I like to do most of the actual truing of the rim, both axially (wobble) and radially (hop) while all of the nipples are free to turn with my fingers. With the normal rim this typically involves getting the offset right at the same time.
When you approach the job by getting the wheel true with the nipples finger tight, it makes it a lot easier to do finally truing. By doing the truing when the nipples are loose you will find the rim will be so close that it only has to be moved very little, often less than .020” during final tensioning. Approaching the job in this manner you will find that the hop is typically within tolerances (.010” to .015”), while you may have to adjust the nipples a bit to take remove any small wobbles. But with all this said, you will find this wheel a bit different. Remember, you always loosen first.
The typical wheel you will be trying to get the spoke tension equal on all 40 spokes. But this wheel is different with the radical different axial angles of the two sides; it is all but impossible to get spoke tension equal. The disc side will always have more tension than the non-disc side spokes. Depending a lot upon the stiffness of the rim it isn’t unusual to get the disc side spokes at 45-50 inch pounds while you will struggle to get the offset right and the non-disc side spokes much more than 25 inch pounds.
I start with working with just the disc side spokes. Begin by going around the rim taking a couple of half turns (half turns because the other spokes are in the way of you taking full turns) on all of the disc side nipples in succession. You go around taking a couple half turns on the nipple until some of the nipples start to touch the rim and the rim no longer shakes on the spokes. It’s the point where things start to come together and it starts to looking and feeling like a wheel. Usually it takes only 10 to 15 nipples coming up to the rim to make the rim stable.
More times than not at this point the rim will have very little hop and a little bit of wobble. Often you will find yourself loosening a couple of the nipples that came up tight and you can get the rim running very true.
At this point go around the rim and turn all of the remaining loose disc side nipples ONLY until they just come up snug to the rim.
What you want at this point is all 20 of the disc side nipples snugged up evenly (just past finger tight), the rim free of all hop with very little wobble, and all of the nipple tension even on all 20 spokes. You also want the rim offset as close to flush, or beyond, with the disc mounting face of the hub as you can get it. When you tighten the non-disc side the rim will be pulled back so you can set your ½” offset.
Brian Slark, Norton Service Manager claimed the wheel builders at the factory would put the disc side of the hub on the floor and stand on the edge of the rim. They did this to get the rim as far over to the disc side as they could. Now, go around the rim, taking a couple of half turns, until all of the disc side spokes are tight (45-50 inch pounds) while making small adjustments as you go to maintain the rim’s alignment.
Note: The disc side inside spoke, being near vertical, has no axial pull on the rim and will only influence the rim’s hop. But the disc side outside spoke crosses to the non-disc side of the rim and will provide a little axial pull on the rim. This tension will help pull the rim back toward the disc side helping you a little bit in maintain your ½” offset. When tightening I often favor the outside spoke a bit over the inside spoke to provide a little axial pull on the rim to the disc side.
At this point you want to finish tensioning the disc side spokes with a close eye on offset (depending on the rim 40 to 50 inch pounds). You also do not want any hop in the rim. It can wobble a bit, but no hop. You will find this easy if you keep all of the spoke tensions even.
The picture above shows a Norton rim with about 1/8″ offset (you want to end up with ½”) before I started to tighten the non-disc side spokes. You want to start with the rim as far away from its final offset position as you can get it. This is important because when you start tightening the non-disc side spokes, they will pull the rim back to, or past the 1/2″ offset very quickly.
Once you get to this point you can thread each nipple in turn on the non-disc side so they just contact the rim. There is no need to go round and round taking half turns. It is now just a matter of doing your final tensioning and truing of the non-disc side spokes – go easy you will never get the non-disc side spokes as tight as the disc side and maintain the 1/2″ offset.
Rim Offset:
1/2″ from the sprocket face of the aluminum hub to the nearest edge of the steel rim. Easy to say, much harder to do!
Building, truing and tensioning spoke wheels requires skills not normally acquired through normal daily living. It is beyond the scope of this document to supply you with all of the information, training and supervision to build a wheel properly. If you feel that you do not have the required skills, or do not have someone to check your work, seek out the services of a professional wheel builder. While not a difficult skill to learn operating a motorcycle with a improperly built wheel is dangerous and can lead to death, or worse!
Problems to look out for:
1. Many modern replacement rims are a lighter gauge
than the original Jones and Dunlop.
Buchanan lists the spoke torque on the
insert in their spoke packaging as such:
“For large displacement cycles, the torque should be in excess of 80 inch
pounds. Hub and rim structure will determine the amount of torque that can be
exerted.”
The key to reading this sentence is the typical British rim is not considered for a “large displacement motorcycle!” Depending upon the rim you can only expect to use 30 to 50 inch pounds when you tension this rim. Because the original Dunlop and Jones rims are a lot stiffer than most aftermarket rims you can often exceed 50 inch pounds. But don’t forget that wheels with cast iron hubs have been know to break if the spoke tension is too high.
2. One should be sure to lubricate the under
side of the head of the spoke nipple where it bears on the rim. This is especially
important when using stainless nipples and or stainless rims. Stainless is prone to galling
and can actually bore a hole in the rim as you tighten the nipple. One must be extra careful when using stainless nipples in a stainless rim. Lubricate the parts well before assembly and stop if the spoke stops getting tighter as you turn it.
Applying too much torque to a spoke can lead to rim failure. It is easier than you think to pull a nipple through a rim. Most British motorcycles are not considered A LARGE DISPLACEMENT
MOTORCYCLE as described in Buchanan’s
instructions! The final torque using an aftermarket Triumph # 06-1951 rim would
be more like 35 to 50 inch pounds on the disc side. It can be a lot less on the non-disc side. This can be a little bit tighter if using an
original Dunlop or Jones rim.
Definitions:
Handed: Some rims are dimpled and drilled so that you can only put them on one way. The 06-1951 Norton disc is handed because of the 3×1 dimpling. The three dimples go on the non-disc side of the wheel. The early BSA front rim is handed because the angles the spokes enter the rim are at different angles for side to side. Most Harley rims are handed because you want the tube stem coming out on the non-sprocket side of the wheel. Many other rims are handed.
Key Spoke: The first of the ten spokes offered to this hub. They are key because they are the ones you must start with.
Cross Pattern: This wheel uses a cross three pattern on both sides.
Dimple: The bulge pressed into the rim to accept the nipple. This rim is what is called 2×2 where two dimples alternate from one side
to the other.
Piercing: The hole in the dimple for the nipple. There are three common sizes: .250″ and .300 used on British wheels and .281″ used on Japanese wheels. This rim is pierced .300″ and you must use a .300 diameter nipple.
Disc Side: The side of the hub where the disc is mounted.
Text and Pictures Copyright John Healy 1998-2015